We are in the throes of a southern summer here, with temperatures in the humid 90s and no relief in sight. I’ve been avoiding my sewing room because the central a/c couldn’t keep up, but finally yesterday I broke down and bought a window unit air conditioner to supplement on the 3rd floor. Last night I went to attach the lining to my current project, and realized that I hated the instructions. You’ve seen them – the sort of lining instructions that call for handsewing part of the lining to the dress. I don’t think it looks very professional to sew part by hand, part by machine, so I used this technique, which I first learned for my Rooibos dress. It’s like a magic trick – it doesn’t seem like it would work, but it does! I hope this helps someone out – lining a sleeveless dress is super easy this way (and it works with facings too!)

Begin with only the shoulder seams sewn in both the fashion and lining fabric. With right sides together, pin the layers together, and sew together at the neckline. For this pattern I made sure to pivot at each of the 4 corners. Trim and grade the seam, clipping all the way to the stitching (but not through it!) for a v-neckline. I use pinking shears here, since the seam will be hidden inside the dress.
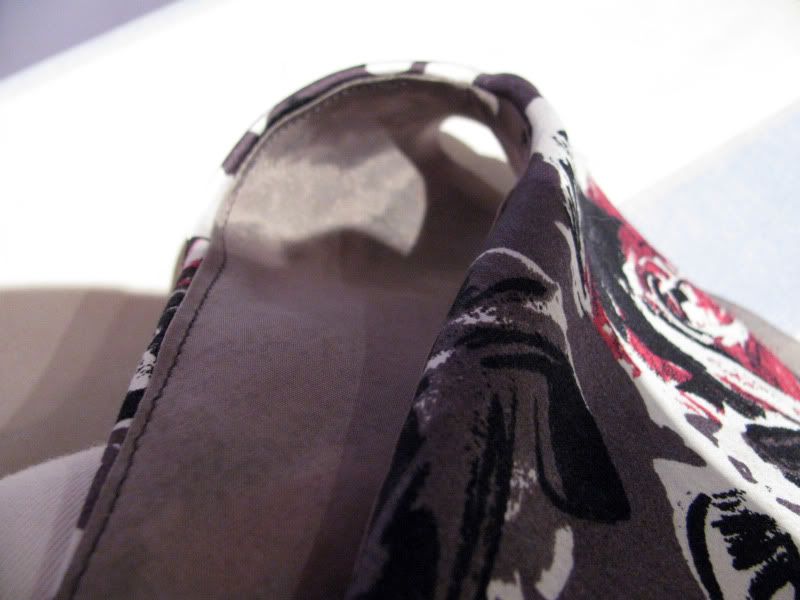
Understitch (ie stitch the seam allowance to the lining) as far as you can. Turn seam rightside out, so that the WS are together, and press your seam.
Now comes the magic part!
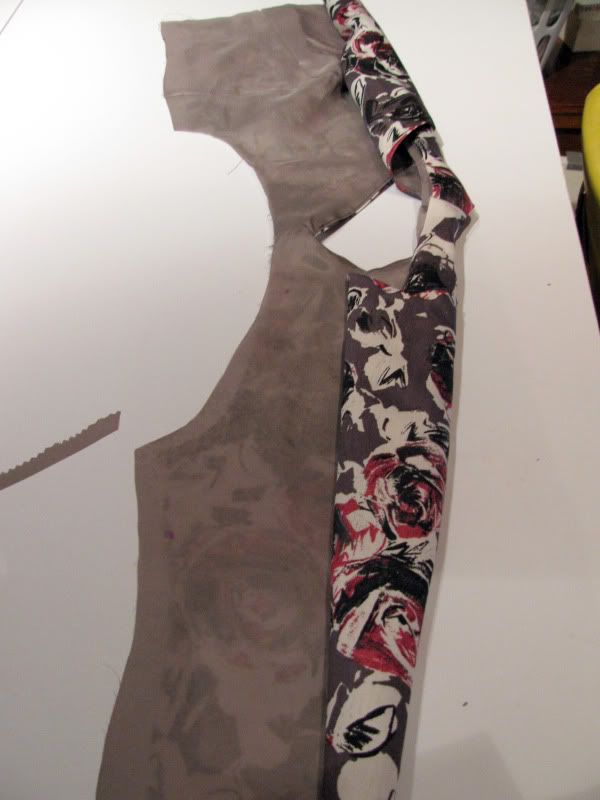
Lay the bodice down flat, with the wrong sides together (the way it is sewn.) Starting at one side, begin to roll the fabric towards the opposite armhole. Now, reach underneath, and flip the fashion fabric out (towards the right in my photo.) Lay the lining fabric over the rolled fabric (again to the right.) You will now have right sides together, and the rolled up fabric will be sandwiched in the middle of the layers. Pin the armhole for sewing.
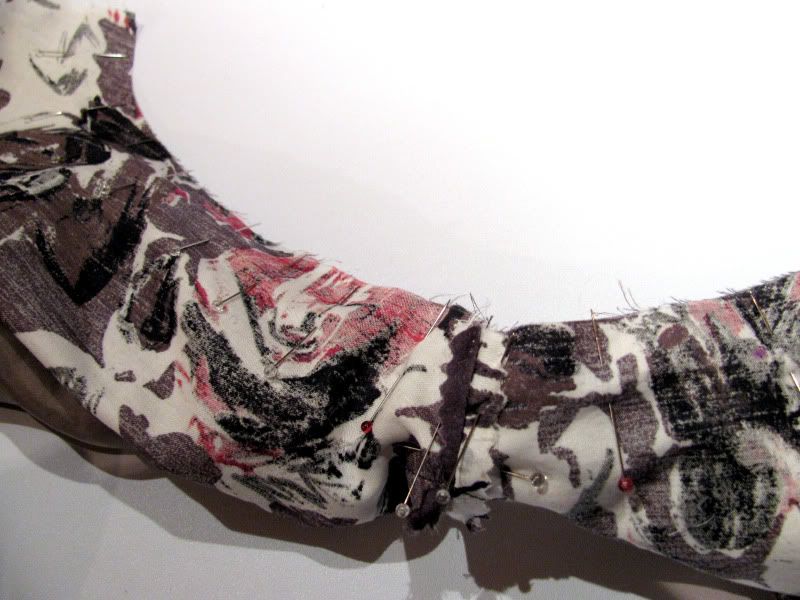
Notice that I have actually pinned the rolled fabric back at the top of the shoulder, since it’s a pretty tight fit there! Now sew your seam, being careful not to catch the rolled fabric in the needle.

Now would be a good time to trim this seam – you won’t get another chance! I actually only trimmed mine around the curves, as I wanted the extra fabric in the shoulders. Now the fun part – grab hold of the end of the rolled fabric, and pull it out through the shoulder.

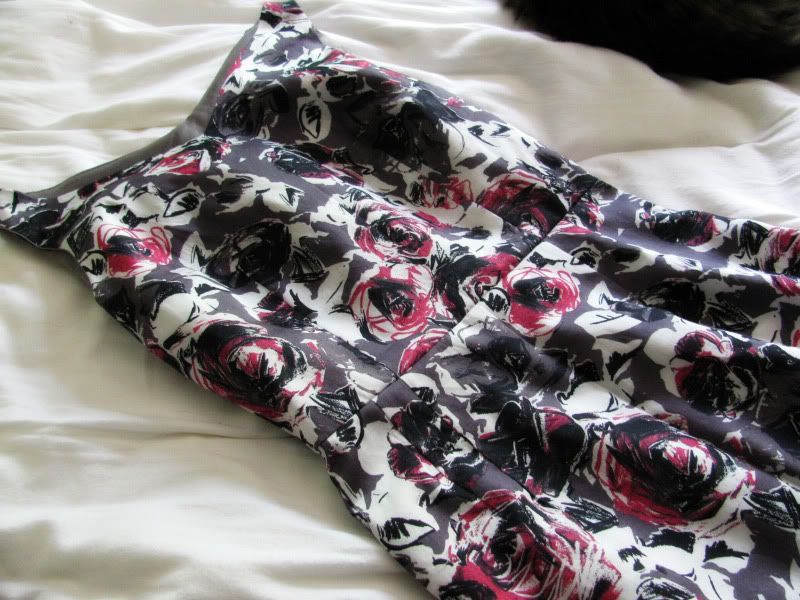
Keep pulling until everything has been turned rightside out – you will now have a perfectly finished armhole! Repeat the same action for the other side. Pull gently – this design has really narrow armholes and I managed, so it will work!
Now, press, and admire your lovely lining. You’re ready to sew the skirt to your dress!
I hope this tutorial helps out a few people – I have seen a few others, but I thought I would write one for those who (like me) need photos!

Great tutorial! Picture tutorials are usually the best, especially when you’re explaining something that works like magic 🙂
This dress is going to be gorgeous! Can’t wait to see it. Also, I wish it was closer to 90 degrees here so it would feel like summer. It was cold and windy this morning!
This tute is SO helpful! I’m a visual learner, too, so I need the pix with the descriptions to “get it”. Thank you, darlin’!
Pictures always make things much clearer thank you! The dress does look gorgeous as Tasia said, especially the neckline, so I look forward to seeing it finished too!
Great tutorial! I will have to try this soon! Thanks for posting it.
Oh my gosh: this is so fantastic! I finally understood what is meant by this rolling things up business – I can’t believe I didn’t get it before.
I cut out the fabric for two tops, months ago!, and kept putting off starting to sew. I think you just motivated me!
I really miss your knitting posts, as a knitter I understood what you were writing about, which is more than I can say for your sewing posts! Having said that, your finished garments are just beautiful, and are convincing me I want to try my hand at sewing! And when I do, I know these will make sense and be very useful.
I have a question. Is your bodice open at the center back for a zip? I thought you could only do this pull through the shoulder technique if the CB or CF was in two pieces (I don’t know where i got that idea though! haha!) I don’t know if I”ve ever tried it when the bodices are in one piece. Great tutorial btw, I love to find cool techniques in patterns that you can use over and over.
This dress as a side zip – maybe she leaves a gap for it and inserts it after? I read this last night, didn’t understand, and reading again today had a ‘ta-da!’ moment. Now I get it… thanks for the post! I’ve made this dress twice (CarolineG on Patternreview), and might try again to give this technique a whirl.
Love your work!
My bodice pieces were whole pieces. No seam in the front or back and it worked. I could not believe how easy it was. Thanks for the tutorial.
Your dress is looking fantastic and finely finished. Thank you for the clear and helpful tutorial- I never trust the methods in pattern instructions.
Your dress turned out so lovely. A full lining makes all the difference!
Thank you for this tutorial! I had seen a similar one before, but yours is much clearer and easier to understand!
Awesome tutorial! I’ve used another technique for my sleeveless dresses for some time now, but your technique is pure Genuis. Thanks for sharing.
I’ve literally being tearing my hair out trying to work out how to do this, and finally came across this tutorial.
Thanks so much for making it so straightforward, and especially for including the pictures – they were a massive help 🙂
thank you, thank you, thank you!!!
thank you!! I have looked at about 10 tutorials that are similar to this one, and yours is the clearest. I wasn’t quite sure what they meant by “flipping the fabric” in other tutorials, and your pictures make it extremely clear, especially because you actually say things like “to the right”.
The dress is adorable btw!
Thank you for a great tutorial on this. I was getting tired of trying, unsuccessfully to figure out how to make this work on my own!
Thank you, thank you, thank you!! I was trying to copy a garment for my kid’s school and couldn’t figure out how they did this without any hand sewing. I LOVE this technique and found your pictures and explanation very clear. Thanks again for posting, you saved my sanity!!!
Hey there!
I love this tute and I’ve used it a few times already.
Do you think I could use the same technique for a sheath dress (no bodice & skirt, instead just a front and back shaped with long darts)? And with a center back zipper??
I inserted a side zip before starting as I read another similar set of instructions that said that can put zip in first. Now I realise was probably talking about a back zip. So I guess I’ll have to unpick it and insert it after. Can you let me know.
I also have nearly torn our my hair.
Kind regards,
Marie
omg, this was so helpful. Thank you for taking your time to explain it. I never could have completed my dress without your instructions!!
This is really, really great! Thanks so much for shariing!!
I got arrowed to make costumes for some church concert (apparently most young women my generation never learned how to sew at all). It is now 02:45 Singapore time. I could have gone to bed an hour earlier if I had found this blog post instead of spending that hour sewing things wrongly, trying to turn the dress right side out, and wondering why I can’t violate the laws of mathematics. and unpicking in sackcloth and ashes..
I read this over ten times I think and still didn’t get it until I sat down with my dress and went along with the steps. Worked like a charm! I am a hands on kind of learner I guess. Thanks for posting!
This made this process so easy. Thank you so much for doing this tutorial.
Cheryl
Hi
I am very happy that I have come across this website. I was looking for something about pulling lining through, and found this. You have awaken my desire ti sew. I love the shrugs.Any patterns available please. I am a new crocheter.
Regards
sandi
thank you for sharing! Will this also work if the dress has a slit in the back to make it easy to get over your head?
Just done this neat little trick. LOVE IT..worked perfect.
Thank you again for shiaring
This helped me so much! Thanks for putting it up
Just came across your post–it’s just what I was looking for. I was going over this problem in my head earlier today, and this is the solution I came up with, but it seemed ludicrous. I’ll definitely try it now, though!
Fantastic tutorial! Thanks so much!
Worked like a charm. Thank you!
Thank you!! I was dreading finishing off the armholes in a decent manner for a formal black tie dress. I found this at the perfect time!
Thank you so much for this wonderful tutorial. It worked beautifully. I must say I could not make it work in my head when I was studying it, but once I had the garment in front of me and followed your directions exactly it made perfect sense. Thank you for taking the time to post and to have great pics and video. Cheers!
I really appreciate these instructions. I am wondering if it will work with a sleeveless sheath dress with a back zipper. When does the zipper get put in?
The tutorial was fantastic. I did it all in no time. Thank you very much for your trouble to put this into the internet.
I just used this tutorial for my first lined dress, and it came out beautifully. Thanks for such clear instructions!
Hey! I know this is kinda off topic but I was wondering
if you knew where I could locate a captcha plugin for my comment form?
I’m using the same blog platform as yours and I’m having trouble finding one?
Thanks a lot!
My brother recommended I might like this website. He was totally right.
This post actually made my day. You can not imagine simply
how much time I had spent for this info! Thanks!
You can also get the help of the DJ in choosing the perfect
music, proper traditions and customs and also plan the proper flow of events throughout the party.
– If your DJ says you have to listen to only what they want
to play, find another DJ. So if you are planning to throw a party or
have a wedding with plenty of dancing, then definitely
get out and rent the services of a reputable DJ so that you
can make happy memories that will last a lifetime.
Hi! This tutorial is amazing! Any chance you could reupload the photos so we can see ’em?? Thanks so so much!!!
Ty
Thank you, great tutorial. cant beleive it worked. 🙂 Can I ask what happens to the side seams.
Thank you for your dress lining tutorial!! I bought a simple 1920’s dress pattern from a small independent company and it didn’t come with detailed instructions. So, I needed the help you offered! You can never have too many pictures so thank you for those as well!
I sewed a dress I’ve sewn before and lined it this time- but now it is too tight? What did I do wrong? Are you supposed to lessen your seam allowances? and would you lessen them on both the dress and the lining? I’m confused!
Hi jdog, you want more lining than the outer fabric at the centre seam. Check a ready-to-wear garment: there is a pleat in the lining at the centre back seam. Allow an inch more lining at the centre back fold and sew a pleat at the middle of the top and bottom seam.
I wore a ready-to-wear skirt once that didn’t have this pleat: the lining actually split because it is too tight when the lining is the same size as the outside fabric.
Less seam allowance is not going to work, you want more movement in the vertical middle of the garment. Good luck!
Thank you so much for this tutorial! I just finished my second tank top from a self-designed pattern, and always hated the way the shoulder seams came out the first time. This worked perfectly.
Thanks .