After much prodding, here is my tutorial for dealing with sleevecap ease!
Before we begin, a question: What is sleevecap ease, and why should I remove it?
Sleevecap ease is the difference in seamline length between your sleevecap and armhole. Most sewing patterns have a cap that is at least 2″ larger than the armhole. Most (but not all) garments that you purchase do not. Not only does the ease make sleeves difficult to set in neatly, it also (for me at least) causes the sleeve to bind under the arms.
I decided pretty early on that sleeve cap ease was not working for me, and it was confirmed when I read this post from Fashion Incubator. I set about trying to come up with a method of removing the ease that wouldn’t make the sleeve hang wonky. Here is what I came up with (note: I am not a scientist or a mathematician!)
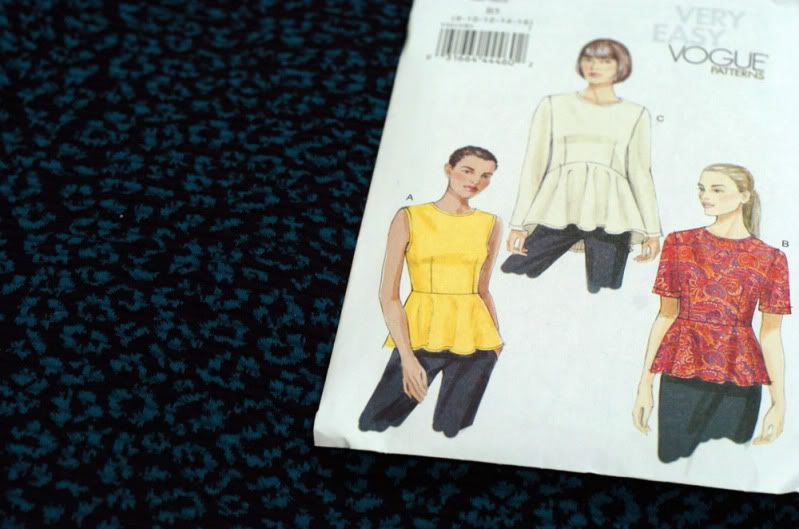
Here is the pattern I’m going to make. Vogue 8815 is the popular peplum top pattern that everyone seems to have made! I’m making mine in a leopard print double knit. Since I’m using a knit for a woven pattern, I will be removing the center back seam and zipper. No matter what you think about wovens, knits most definitely do not need sleeve cap ease! Here is how I set about removing it.
Materials:
Seam gauge or flexible ruler
Clear acrylic quilting rule
French curve (optional)
A note about materials: You can make due with a seam gauge, and that’s what I’ve used here, since I figure everyone has one. However, you will make your life much easier if you purchase a flexible ruler – it can stand on end and be shaped to the seamline, making measuring the armhole a breeze! If you’re going to do this often, you will also want a set of french curves (they’re good to have anyway – I use mine all the time!)
Begin by cutting and pressing your pattern pieces. You need the sleeve and whatever body pieces comprise the armhole (usually a front and back, but occasionally it also includes a yoke or some such piece.)
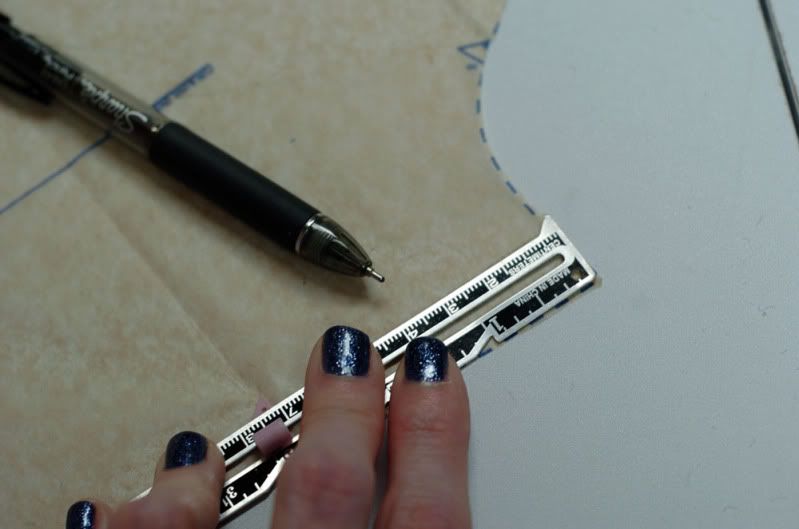
Using your seam gauge, make a line on your sleeve piece at the 5/8″ seamline on either end. You will not include this in your measurements. Do the same for the front/back pieces.

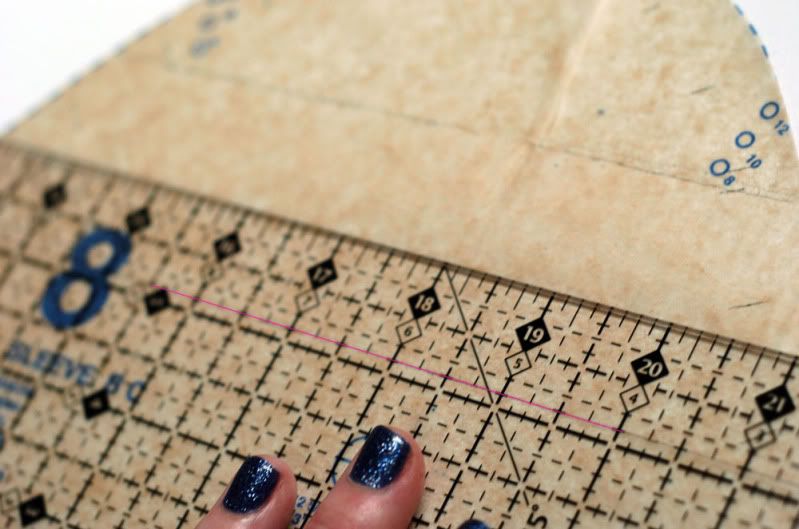
Now you will measure your pieces, beginning with the sleeve. Place the 1″ mark on the seamline you just marked. Remember that you are measuring seamlines, not the edges of the piece – you want to measure 5/8″ in from the edge all the way across. Your seam gauge is 5/8″ and will work. If I use the seam gauge I like to mark every inch – that way I know I’m being accurate (though it will never be as accurate as the flexible ruler, it’s close enough for most things.) My marks are shown in pink below:
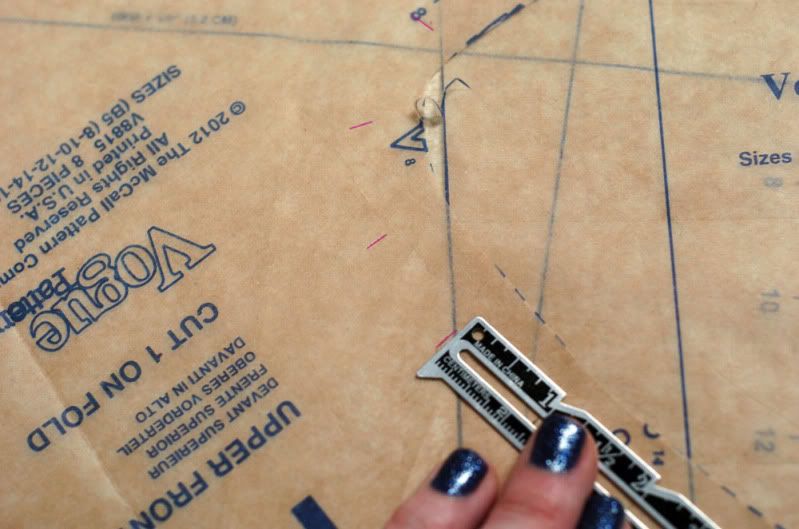
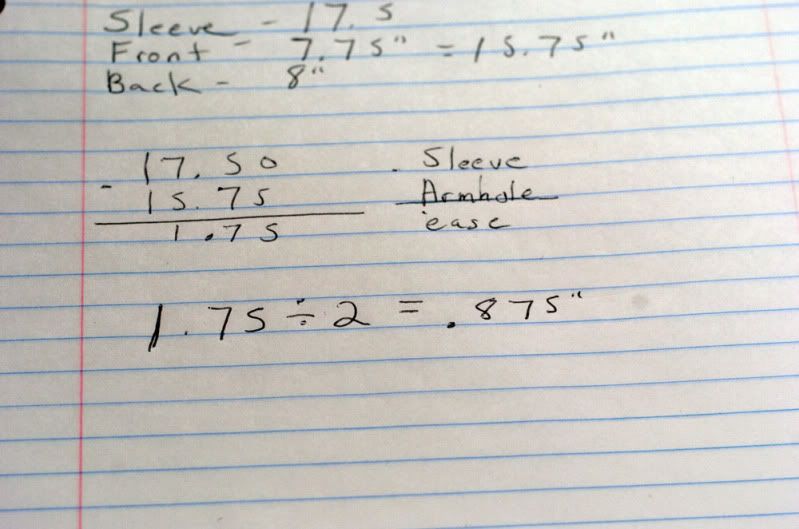
Count the number of inch markings from seamline to seamline. This number is the length of your sleevecap. Write it down, and do the same measurement for the front and back armhole pieces.
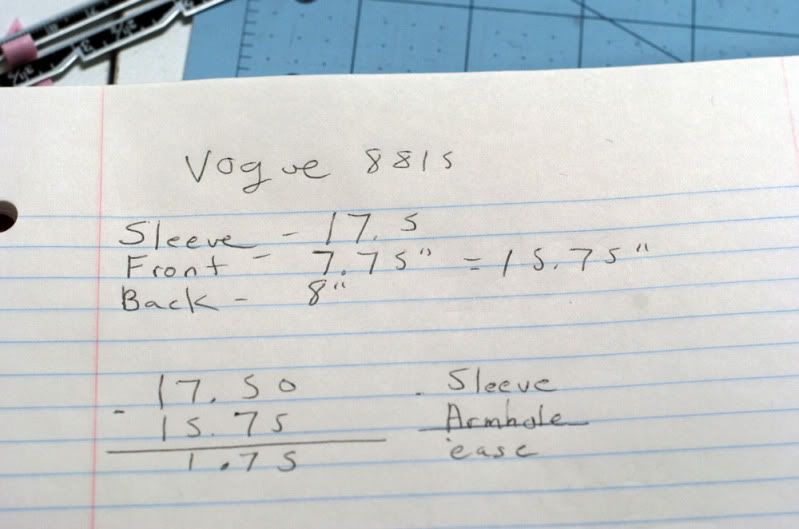
Now you will add the front and back measurements together and subtract them from the sleeve measurement (Sleeve length – armhole length = ease). I ended up with 1.75 inches of ease in my sleeve. It may not seem like a lot, but removing it will make my life a lot easier (and give a nicer fit!)
In order to remove the ease you will draw 2 lines on the pattern.

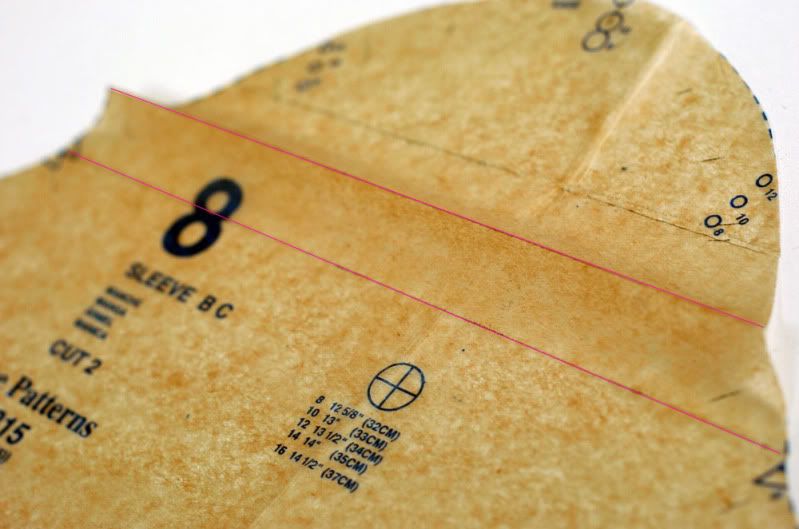
You want to create a line that is perpendicular to the grainline, going between the notches on the piece. Line the top of your ruler up with the notches (I usually aim between the 2 back notches.) Now make sure that your grain marking lines up with one of the straight lines on the rules. Draw a straight line on your piece between the notches.
Now you will need to fold out the excess. Since we are making a double fold, you need a mark that represents half of the total ease:
I need a mark .875 inches above my original line (making it above preserves the notches for setting in the sleeve.) I will round that number up and mark:
You can see that my original line is at the 7/8″ mark, marked in pink above. I’m also continuing to line up with the grain marking, ensuring a line that is parallel to the first. Draw your second line. (Not shown above – ignore the mark above, it’s a mistake!)
Now your will fold a crease on the top line:
and then you will crease on the bottom line, folding the top line over the bottom:
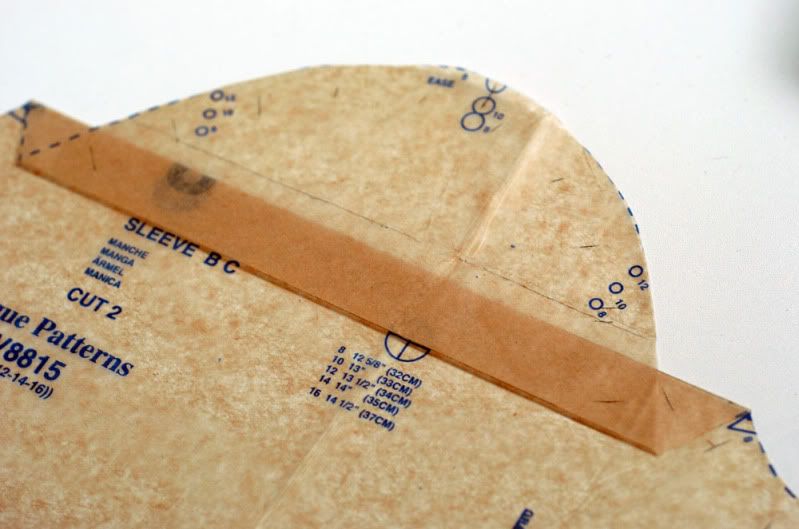
You have now folded out the sleevecap ease. The fold will only appear to be 1/2 of your ease measurement, but as it’s doubled over the entire amount is folded out. Pin the fold in place and prepare for cutting. In order to cut you will need to recreate the sleevecap curve. Here is where your french seam will be handy!

Pin the piece to your fabric and trace around the new curve with chalk. Now you can cut, being careful to follow the chalk lines. This bit is optional – if I’m being honest I often just eyeball the new curve and it turns out fine, but the french curve is useful when you are new (or if you want consistency!)
Now you can sew your sleeve to your bodice. I generally sew in sleeves after sewing the shoulder seams, but before closing the bodice side seams. This allows me to fit my garment at the end, and I find sewing in sleeves flat to be much faster! The only exception is for a tailored garment (jacket etc.) For knits and casual garments I think sewing flat is just fine. You should be able to match your notches and center sleeve dot to your pattern as usual. The only difference is that you will not need to run a line of basting stitches – it should line up! If you measure wrong and wind up with a bit extra you can adjust this in sewing – just allow the top of the cap to extend over the armhole and sew on the armhole’s 5/8″ seamline.
I hope this tutorial is helpful! I know it looks like a lot of steps, but after doing this repeatedly I can now manage it in five minutes – worth it to avoid the headache later on!

Great instructions. Thanks for sharing!
You did a great job explaining that. I hate all that extra ease, it makes sleeves puffy that aren’t even meant to be puffy and even if I gather it carefully I always end up catching it at least twice somewhere and having to unpick and redo over and over. I kind of cheat around it when I pin the sleeve in by pulling the top of the cap further in (sort of increasing the seam allowance) but I’m going to try your method next time 🙂
Love this! Thanks for sharing & taking time to write it.
I’m still a beginner, and was pretty frustrated with easing in sleeve caps on a recent very simple sleeved shift. For some reason the first dress came out okay, but the second (in a much lighter woven fabric) seemed to obviously have too much ease in the sleeve cap. No matter how carefully I gathered and steamed, I had what looked like a puff sleeve instead of a smooth, set in sleeve. I ended up doing something like kiwi above, but the armpit is uncomfortable. I will definitely try your method next time!
This looks really clear, thank you for putting up such clear detailed instructions…I feel confident I could try it now!
Thanks! I know I’ll refer to this often
Thanks, Jessica! I appreciate you taking the time to show us how to do this. A huge headache and time saver!!! Carrie
With all these silly webtsies, such a great page keeps my internet hope alive.
Thank you thank you thank you! I’m about to make a simple shift dress from a poly charmeuse, and I can already tell that the sleeve ease is unnecessarily enormous. There is no amount of steaming that can make poly ease in well, so I’ll try this out tomorrow.
Thanks for the explanation, I understand the process, I do have a question, though.
If the sleevecap is 17.5 and you remove “the extra” 1.75 the way you showed, doesn’t that mean that you actually remove 3.5 in total? I mean, the double fold is across the whole sleeve, so the back part of the sleevecap is 1.75 smaller, but the front too. Am I making any sense with my question?
That’s a good question, and I had to call my mathematician husband after I read your comment to confirm that what I wrote was correct (I had him check over the post to make sure.) He assures me that it’s correct, and tried to explain the reason, but well… I’m not actually good with math, so I don’t think I can. It works though – I have used this method for years, and I have yet to end up with a cap that is too small for the seamline (though I have occasionally measured wrong and ended up with too much!)
Thanks for your answer. I had to call my husband too, though I am usually the more mathematical one. I think I didn’t take into account that the sleevecap is curved – it would have been different if it was a square. I am not sure that I completely understand, but I am convinced that your way is correct (I should just go and try, that probably works better than this theoretical exercise ;)) Thanks again, I hope I didn’t give you a headache…
It works because of that last picture where you true the line back up. The curve along the French curve is inevitably longer than the curve running from the top of the horizontal fold to the point where they join further up the sleeve cap – think of it like the hypotenuse of a triangle. It won’t be exactly 0.875 inches on each side – but for this purpose it’s good enough.
Maths graduate here – can you tell that I’m a bit of an alterations nerd?! 😎
Thanks for the tutorial, I had been wondering about how you do this!
I love that peplum pattern – I think it really wants to be made from a knit, I can’t imagine it in a woven. I wonder if it would work for my figure.
So great to see an antidote to the puffies!
That looks so easy. I have seen other how tos but they all involved slashing and re tracing.
Thanks, so much for this post, I just made three peplums from the same pattern on one of the them the sleeve Pulls funny. I didn’t know how to correct it. This post was what I needed to learn! Again thanks for sharing :.)
I’m usually fairly successful when setting in sleeves, but it just takes so damn long to do a nice job, and NOTHING can help me when I come across the odd pattern that has way too much ease. This is going to make my life a lot easier. And thanks for the book recommends a few months back. I just started one of the and am enjoying it.
My mother taught me a method for controlling sleeve easing. She was a home economics graduate .
1. Cut the sleeve as given on the pattern. Often I cut an extra notch to denote the shoulder spot on the sleeve , usually a big circle on the tissue.
2. Run a basting (longest stitch ) , machine stitch along the seam allowance from single notch to double notch along the top of the sleeve. Leave an inch or so of thread at each end. I do this on the right side of the sleeve as the bottom (bobbing side ) thread is the pull thread and I can see it when I need it ( more later on this part).
3. Run another stitch 1/4 ” away from the first line of basting stitches on the inside of the seam allowance. Again, leave pull threads on both ends.
4. Sew the under seam allowances for the side seam of the garment and the sleeve.
5. Now, the “fitting ” part.
On the wrong side of the sleeve , gently pull the two threads to gather the sleeve , much as you would gather a skirt. The sleeve cap will become much smaller.
After it is gathered, then slowly “ungather ” it by allowing the cap to form . I shape it with my fingers to form a sleeve cap shape. I hold the sleeve so that my thumbs are on top and my fingers work the underneath side. When I hold it up, it will look like a sleeve without tucks or folds. The ease may make a very slight rise to the outside of the seam allowance.
6. Pin the notches to notches and seam line to seam line. Adjust the gathers to fit between the notches… loosen if not enough fabric between notches , or gather if too much fabric is between notches.
7. Extremely rarely do I have problems . When I do, it is usually my carelessness that cause tucks or folds. Often, I hand baste a large stitch to hold the seams together until sewn.
This method lets me adjust the fit , if I hand baste the sleeve to the garment : take out part of the basting that needs moving, rebaste and retry the garment until just right.
The ease is there for a purpose.
Try it on a scrap of fabric and see what you think !
I really enjoy your blog and check everyday to see what is new !
I am 60+ and enjoy watching your creations !
I like what you’ve done and after lots of sewing, I know I’ll need to remove ease for someone one day – for sure.
Thanks for sharing! So helpful!
i understand perfectly what you’re doing and why it works. without the math and the actual figuring it out, i’ve been eyeballing it it for years, usually successfully,but not always, so the real.methodology is great to know. but i do have a question: when i eliminate the ease, i often find it hard to raise my arms without the cap bunching up. what am i doing wrong?
i have another question slightly off track, but slightly related. i find that i constantly tug my shirts down in the front. i know that i’m putting the sleeve in wrong. that is, i’m putting the sleeve in the way the pattern says to, but it’s wrong for me. i have a big bust and i thought that the shirts were just riding up to my smaller upper bust measurement, but i now know that’s not what’s happening. should i be inserting the sleeves into the finished shirt with the large dot marking NOT lined up with the shoulder seam? or maybe the shoulder seam NOT
lined up with the collar stand? do you, or anyone else, know the solution?
Excellent post and great timing too – I was just about to cut out that very pattern. I hate the extra ease but I usually just shave off the top of the sleeve cap and that works ok. However after this description I think I may be changing my ways!
Hi, Jessica! Thanks for the tutorial. I’ve read Kathleen Fasanella’s anti-sleevecap ease rant a couple of times, but I never understood how to remove the ease!
I used your method of removing sleevecap ease on a bodice block I’m putting together for myself, but I seem to be getting some diagonal sleeve wrinkles that might indicate that the sleevecap is now too short. I picked up a copy of Sandra Betzina’s ‘Fast Fit.’ She gives a method for removing sleevecap ease that involves slashing and overlapping the pattern vertically, rather than shortening the cap height. Was there a particular reason you lit upon your method? Have you ever had trouble with the sleevcap being too shallow? (I understand that a short sleevecap will give you a greater range of motion but more wrinkles?) I would love to hear more about your process. 🙂
Thank you again for the tutorial!
I haven’t experienced that particular problem, but if I’m being honest I’m not super worried about the fit in that area. I have Fast Fit, which is a great book (though I like “Fit for real people better.”) I went with my method before I had read a verbal description of something similar, and I found it easier to do than Sandra’s. But give hers a try – it might work better for you!
I always eliminate sleeve cap ease, and I usually sew a 3/8 seam allowance on the armscye to bring the seam line out further on my shoulder. That seems to help with range of motion. I spend most of my day with my arms in front of me, not at my sides, and I find that my tops rotate toward the back as well, and I’m also always pulling my top down in the front. I’m wondering if maybe I need to rotate the shoulder seams backward or forward. Does anyone have any ideas about this?
Thanks for the tutorial! I can’t tell you how much I love this blog–its the highlight of my reader! You have such great taste, lovely photographs, great topics (sewing and non-sewing), a wonderful blogging voice, and huge talent. You also seem like just a decent human being!
H mm… I’m not sure about the shoulder issue. I know that for me the actual armhole depth is often too much, so I am forever removing fabric at the shoulder seam!
I use “Fit for Real People” as my fitting resource (I have Sandra Betzina’s fast fit too, but it’s not as detailed.) I’m so glad you enjoy my blog – thanks for the tip about the 3/8″ seam!
I used to have this problem and it was so terrible and yes, it seems, my shoulders rotate forward which is never taken into consideration with patterns. As a standard alteration, I rotate the shoulder seam 1,5 cm forward and it works like a charm! My tops hang so well now and are so, so comfortable! Give a try. 🙂
Hi! Thanks for your tips on removing sleeve cap ease. There’s just one thing I can’t figure out. Why would the sleeve tend to bind under the arm if you have ease in the sleeve cap? Why is it less binding if you get rid of the sleeve cap? I can’t make sense of that part. My sleeve does seem to be binding under the arm, but I can’t tell if it’s because the arm hole is small or something else.
Hello ! Man was I happy to see this , I’ve been at wits ( being self taught ) trying to tell people ” I don’t think you need cap ease at all” however I would like to know of any resources videos etc you could direct me too to give visual toots. Thank you again !
When buying caps for kids, make sure it is family friendly
and appropriate for kids to wear them. The
knot on the back of her hair will be like a cherry on an ice cream cone.
This past year, my husband came up with a great and cost effective costume idea for Halloween.
I simply hoped to just take a couple of seconds and inform
you that I liked the post. I frankly don’t believe generally people know exactly how much energy that gets put into making a good post. I recognize this is sort of random but it bugs me sometimes. Anyhow nice site.
11. Do not fb stalk the new boo’s photos. Or mini-feed, even. If I like a guy and we are in that acquiring to know you “friend/but-could-this-be-more” stage, I accept the pal request and maintain it moving. Anything more may possibly make you crazy (for no reason, in numerous cases).
Hi my family member! I want to say that this submit is incredible, nice written and include virtually all important infos.
I’d like to look more posts like this .
fantastic! thank you!
I always used to study paragraph in news papers but
now as I am a user of net therefore from now I am using net for
articles, thanks to web.
Thanks so much for this! I’m making a man’s jacket and the ease was driving me insane. There was no way to make that sucker fit without puckering. Your method worked beautifully and the sleeves are now perfect. Thank you!!
I just used this technique and it worked great! Thanks so much 🙂
Great goods from you, man. I’ve understand your stuff previous
to and you’re just extremely excellent. I actually like what
you have acquired here, certainly like what you’re stating and the
way in which you say it. You make it enjoyable
and you still take care of to keep it sensible.
I can’t wait to read much more from you. This is actually a terrific website.
That’s more than senbesli! That’s a great post!
What’s up to all, thе сontents existing at this site are гeally awesome fοr people knowledge, well,
ƙeep up the gooԀ work fellows.
This is awesome!! I made a pattern to recreate my husband’s favorite aloha shirt (we’re living in Hawai’i right now). I made a muslin first, and I haven’t finished it because his sleeves are so puffy!! I have tried numerous things to get rid of the extra ease, but none worked. I am going to try your method tomorrow! Thank you in advance…I’m sure it’s going to work!! 🙂
You are a gem!
Thanks for this fabulous post. I am soooo happy with the result the method gave me. A perfect and absolutely clean sleeve cap. It makes my past, eased, versions look so shoddy by comparison. Just so home made.
This is my new go-to couture method.
I want to show my appreciation to you just for rescuing me from this trouble. Just after surfing throughout the world wide web and seeing methods that were not helpful, I assumed my entire life was gone. Existing without the strategies to the difficulties you have resolved all through your good guide is a serious case, and ones which may have in a negative way affected my entire career if I hadn’t encountered your blog post. The natural talent and kindness in dealing with every part was vital. I don’t know what I would have done if I had not come upon such a subject like this. I’m able to at this point look forward to my future. Thanks so much for your impressive and result oriented help. I won’t think twice to propose your blog post to anybody who needs and wants guidance on this problem.
Hi. Thanks for this! For long sleeves, will it not shorten the length of the sleeves? Do I add the cms removed at the cap to the bottom of the sleeves and redraw my seam lines?